Skip to main content
DIY Display Case (Acrylic/Plexiglas)
- This is the DIY guide I followed
- finding a local supplier for acrylic took some effort. You find either 1) actual supplier/manufacturer which will be cheap but the minimum size is a huge 4"x8" and they may not sell it to you. 2) a retailer with more manageable sizes and volumes but also more $. Home Depot actually carries acrylic too (2"x4"x1/4" for $60 I think). So depending on how much you actually need and the suppliers willingness to help you make a few cuts for nominal charge your choices are limited
- material cost varies greatly depending on thickness. 3mm to 4.5mm to 6mm almost doubles the cost each jump. Of cause thicker will look better on larger case though
- as for tools you really do need a rotary tool, table saw, router and router table. You could do without the saw if you manage to get your panels pre-cut. I already had some so it helped but I still spend a good $300 on just tools and misc. I tried to sand the edges manually but you just can't get them perfectly flat and straight which always resulted in poor adhesion and poor finish in my experiments so I ended up using the router table to clean all edges suitable for gluing and buffing
- I would recommend to bend acrylic for better build, looks and possibly less work but that means one more tool and one more skill to manage. You can buy ($300+) or make a strip heater. I did a DIY following this guide but instead of an improvised heating element from a hair dryer or toaster I bought the actual replacement heating rod for better quality from kidder.ca for $40. BTW I was told you can only bend Extruded acrylic and not Cell Cast type and you cannot bend anything thicker than 4.5mm. Cell Cast is suppose to be better for routing
- Toughest part is to ensure that everything you process is perfectly parallel or perpendicular. I made my life a little easier when strategizing the build with the assumption that the final case dimensions will NOT be accurate. The focus is to NOT build a crooked case. Assuming all cuts are parallel and perpendicular the two bends I made were most critical as they needed to be parallel and of the same distance from the edge so the box is proper. I used clamps and extra MDF pieces to lock down the distance to the element so the bend is 100% identical on both sides.
- don't bother trying other than the recommended glue, cause I did that for you already spending >$40 and my advise.... don't bother!! Even if you follow the guide it is still difficult to get the end result to look perfect
- Weldon #4 seems to be impossible to source and poisonous but I am sure there are alternatives (kidder.ca has something I am going to try when I run out of Weldon) but still poisonous. I better look into respirators if I am to make more of these
- Ones assembled I used the buffing compound and my rotary tool to make the exposed edges transparent again (don't worry about the edges you glue, the glue will dissolve the edge enough for a transparent look
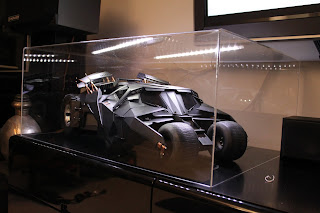
- THINK EVERY STEP THROUGH.. I had to improvise a few tools and methods to ensure accurate build.... This is definitely one of the more challenging DIYs I have done and if you only need a case or two pay someone to do it...... BTW I made the case for my Tumbler and X-Wing and 2 more. I will be enhancing my computer stand with acrylic as well :)
Updated notes:
- Having build my first batch of cases (and more to come as I want to dust proof everything now lol) I will log more of my experiences here
- Translucency of the edges turns out to be a strange phenomenon. routed and unbuffed it will be hazy but it is good enough to be used to glue and tape but when used as a surface you will need to buff it out to get that shine and translucency
- You could go the extra mile and sand it first for a real smooth edge but you will likely loose the perfect straight and flat characteristics of the edge so until I find a better method and efficient method I rather keep it as is
- Now here is the interesting part..... the edge even after buffering and even if sanded down perfectly will NOT look transparent if the wall behind it is a light color. Transparency is the perception of being able to see THROUGH an object. For the main surfaces that is not an issue. However for the edges it really is tunneling the image or the color of the wall behind the display so if your base is black, your objects are dark and your backwall is white no matter how perfect the finish of the edge is in most angles it will look white

Wow,that's pretty amazing. I've been meaning to get or make some cases for my Hot Toys collection recently, and I'm very glad I found this blog. Unfortunately, I'm poor and haven't had display cases for any of my 1/6ths ever, so I'd like to ask, what do you use to clean them? Particularly the rubber Batsuits and the Tumbler/Batpod? I'm afraid that if I try to clean them, I'll ruin them all and, as you know, there's quite a bit invested in this hobby. If you don't know, fine, but could you point me in the right direction? I'd appreciate it!
ReplyDeleteProbably too late now.. a year late LOL ..... Sorry but I don't get notifications for comments so didn't realize some were left here. for cleaning I use compressed air cans and at best a wet towel. NEVER USE AMOURALL NEVER ;)
DeleteThat's very amazing display case, a fine category of acrylic displays in which snap frames and brochure holders are there.
ReplyDeleteI'm pretty impressed. I don't do well putting things like this together. However I have been looking for a cheap way to get acrylic display cases for some really rare dolls that my mother collected. Getting one custom made would be nice but your tutorial makes it look like it isn't too unmanageable.
ReplyDeleteWow it's been 3yrs already. I finally got the notification working too LOL
DeleteDepending on what size case you are looking for, how many of the tools you already have and how demanding you are on the finishing of the edges DIY is possibly feasible. But the amount of effort to find a supplier and time spend in making it you might want to first try to source a company that is willing to do it for you at a reasonable amount with no minimum charge. I say if you only need one larger case you are better of finding someone to do it for you.
In the meantime I have moved away from glueing panels as it always results in some bubbles in the joints and I am picky so it is an eyesoar to me :P
Since display cases don't really need to be build like a fish tank I have been looking at alternative ways to join the panels using using adhesive tape instead. My first attempt has been good but forced me to use rather expensive 1/4" panels but I am currently working on a new approach to avoid that.... trying to design around the problem so to speak....
Also many of my fellow collectors have been using the rather affordable Ikea detolf display cases which if usable is the most cost effective way to show of your collection as long as it fits and I suspect your dolls should do too? especially if you have multiples? Another more flexible solution would be the Ikea Besta line. I use them myself and only resort to making cases for oddly sized items or my upcoming custom shelf
Hello Geil -
DeleteI know you're not really on the Freaks board anymore, but I'm hoping to reach you. I want to make you an offer for your custom TDKR armory ("The Box") that was made about 4 yrs ago. Please let me know if you still own it and would be willing to sell.
Offering $800 USD shipped for it.
I'm aware there were issues with shipping and it arrived with broken pieces that had to be reconstructed. I am very much interested in this piece. Please let me know either way. I sent you a PM on the Freaks board. My boardname there is "gcard76." Thanks in advance.
Thanks for your PM on the Freaks board, Geil! Excited to hear back from you -- thought it would take longer to get message to you. Sent you a reply PM on the Freak boards just now. I read your words of caution, but I want to proceed with acquiring this piece. I wrote you some possibilities regarding shipping. Let me know. Thanks!
DeleteThis comment has been removed by the author.
DeleteThanks for your PM on the Freaks board, Geil! Excited to hear back from you -- thought it would take longer to get message to you. Sent you a reply PM on the Freak boards. I read your words of caution, but I want to proceed with acquiring this piece. I wrote you some possibilities regarding shipping. Let me know. Thanks!
DeleteIt’s truly a nice and helpful piece of information. I am glad that you simply shared this useful info with us. Please stay
ReplyDeleteus informed like this. Thanks for sharing.
Display Boxes